You pull a load of laundry from the washer, expecting a fresh, clean scent, but instead, you’re met with a faint, musty odor. Or perhaps you’ve spotted that unpleasant black gunk forming in the rubber seal, making you question how hygienic your “clean” clothes truly are. This is a common frustration, but the solution is more straightforward than you might imagine. Learning the professional method for how to clean a washing machine is the key to restoring its performance and giving you complete confidence in every wash cycle.
In this thorough, step-by-step guide, we provide the expert techniques to deep clean any appliance, whether you have a top-loader or a front-loader. We will help you eliminate stubborn odors, dissolve hidden buildup, and establish a simple maintenance routine to extend the life of your machine. Our goal is to deliver more than just a spotless appliance; it’s to provide the peace of mind that comes when your clothes don’t just look clean-they truly feel fresh, hygienic, and cared for.
Why You Must Clean Your Washing Machine: A Professional’s Perspective
You trust your washing machine to deliver fresh, spotless laundry with every cycle. But what happens when the appliance designed for cleaning becomes a source of grime itself? At a glance, the stainless steel drum may look pristine, yet hidden within its components, a combination of residue and moisture creates the perfect environment for unpleasant buildup. Understanding why you must clean your appliance is the first, crucial step in learning how to clean a washing machine effectively for truly fresh results.
With every load, invisible culprits build up inside the machine. A combination of soap scum, fabric softener residue, hard water minerals, and body oils forms a stubborn film on the drum, in the pipes, and under the seals. The very principles of Washing machine technology and design that make them so effective also create a consistently damp environment where mold, mildew, and bacteria can flourish. This not only leads to musty-smelling clothes but can also impact the appliance’s efficiency and shorten its lifespan by causing clogs and corrosion.
The Sources of Grime and Odors
As cleaning professionals, we know that the root of the problem lies in a few key sources that accumulate over time:
- Soap Scum & Detergent Residue: Using too much soap or softener leaves behind a sticky residue that traps dirt and encourages microbial growth.
- Hard Water Minerals: Calcium and magnesium deposits create limescale, a hard, chalky substance that can trap odors and reduce performance.
- Mold and Mildew: These fungi are the primary culprits behind that persistent musty smell, thriving in the damp, dark crevices of the machine.
- Biofilm: A slimy layer of bacteria forms from body soils, shed skin cells, and fabric fibers, contributing to odors and residue on your laundry.
Signs Your Washing Machine Needs a Deep Clean
Your appliance will give you clear signals when it’s time for a thorough cleaning. Ignoring them means your clothes won’t just look clean-they’ll feel clean. Pay attention to these tell-tale signs:
- A persistent musty, sour, or mildew-like odor coming from the drum or door.
- Visible black or gray spots of mold on the rubber door gasket, especially in front-loading models.
- Clothes that still smell stale or musty immediately after being washed.
- A grayish residue, lint, or dark flecks left on your “clean” laundry.
The Complete Step-by-Step Guide to Deep Cleaning Your Washer
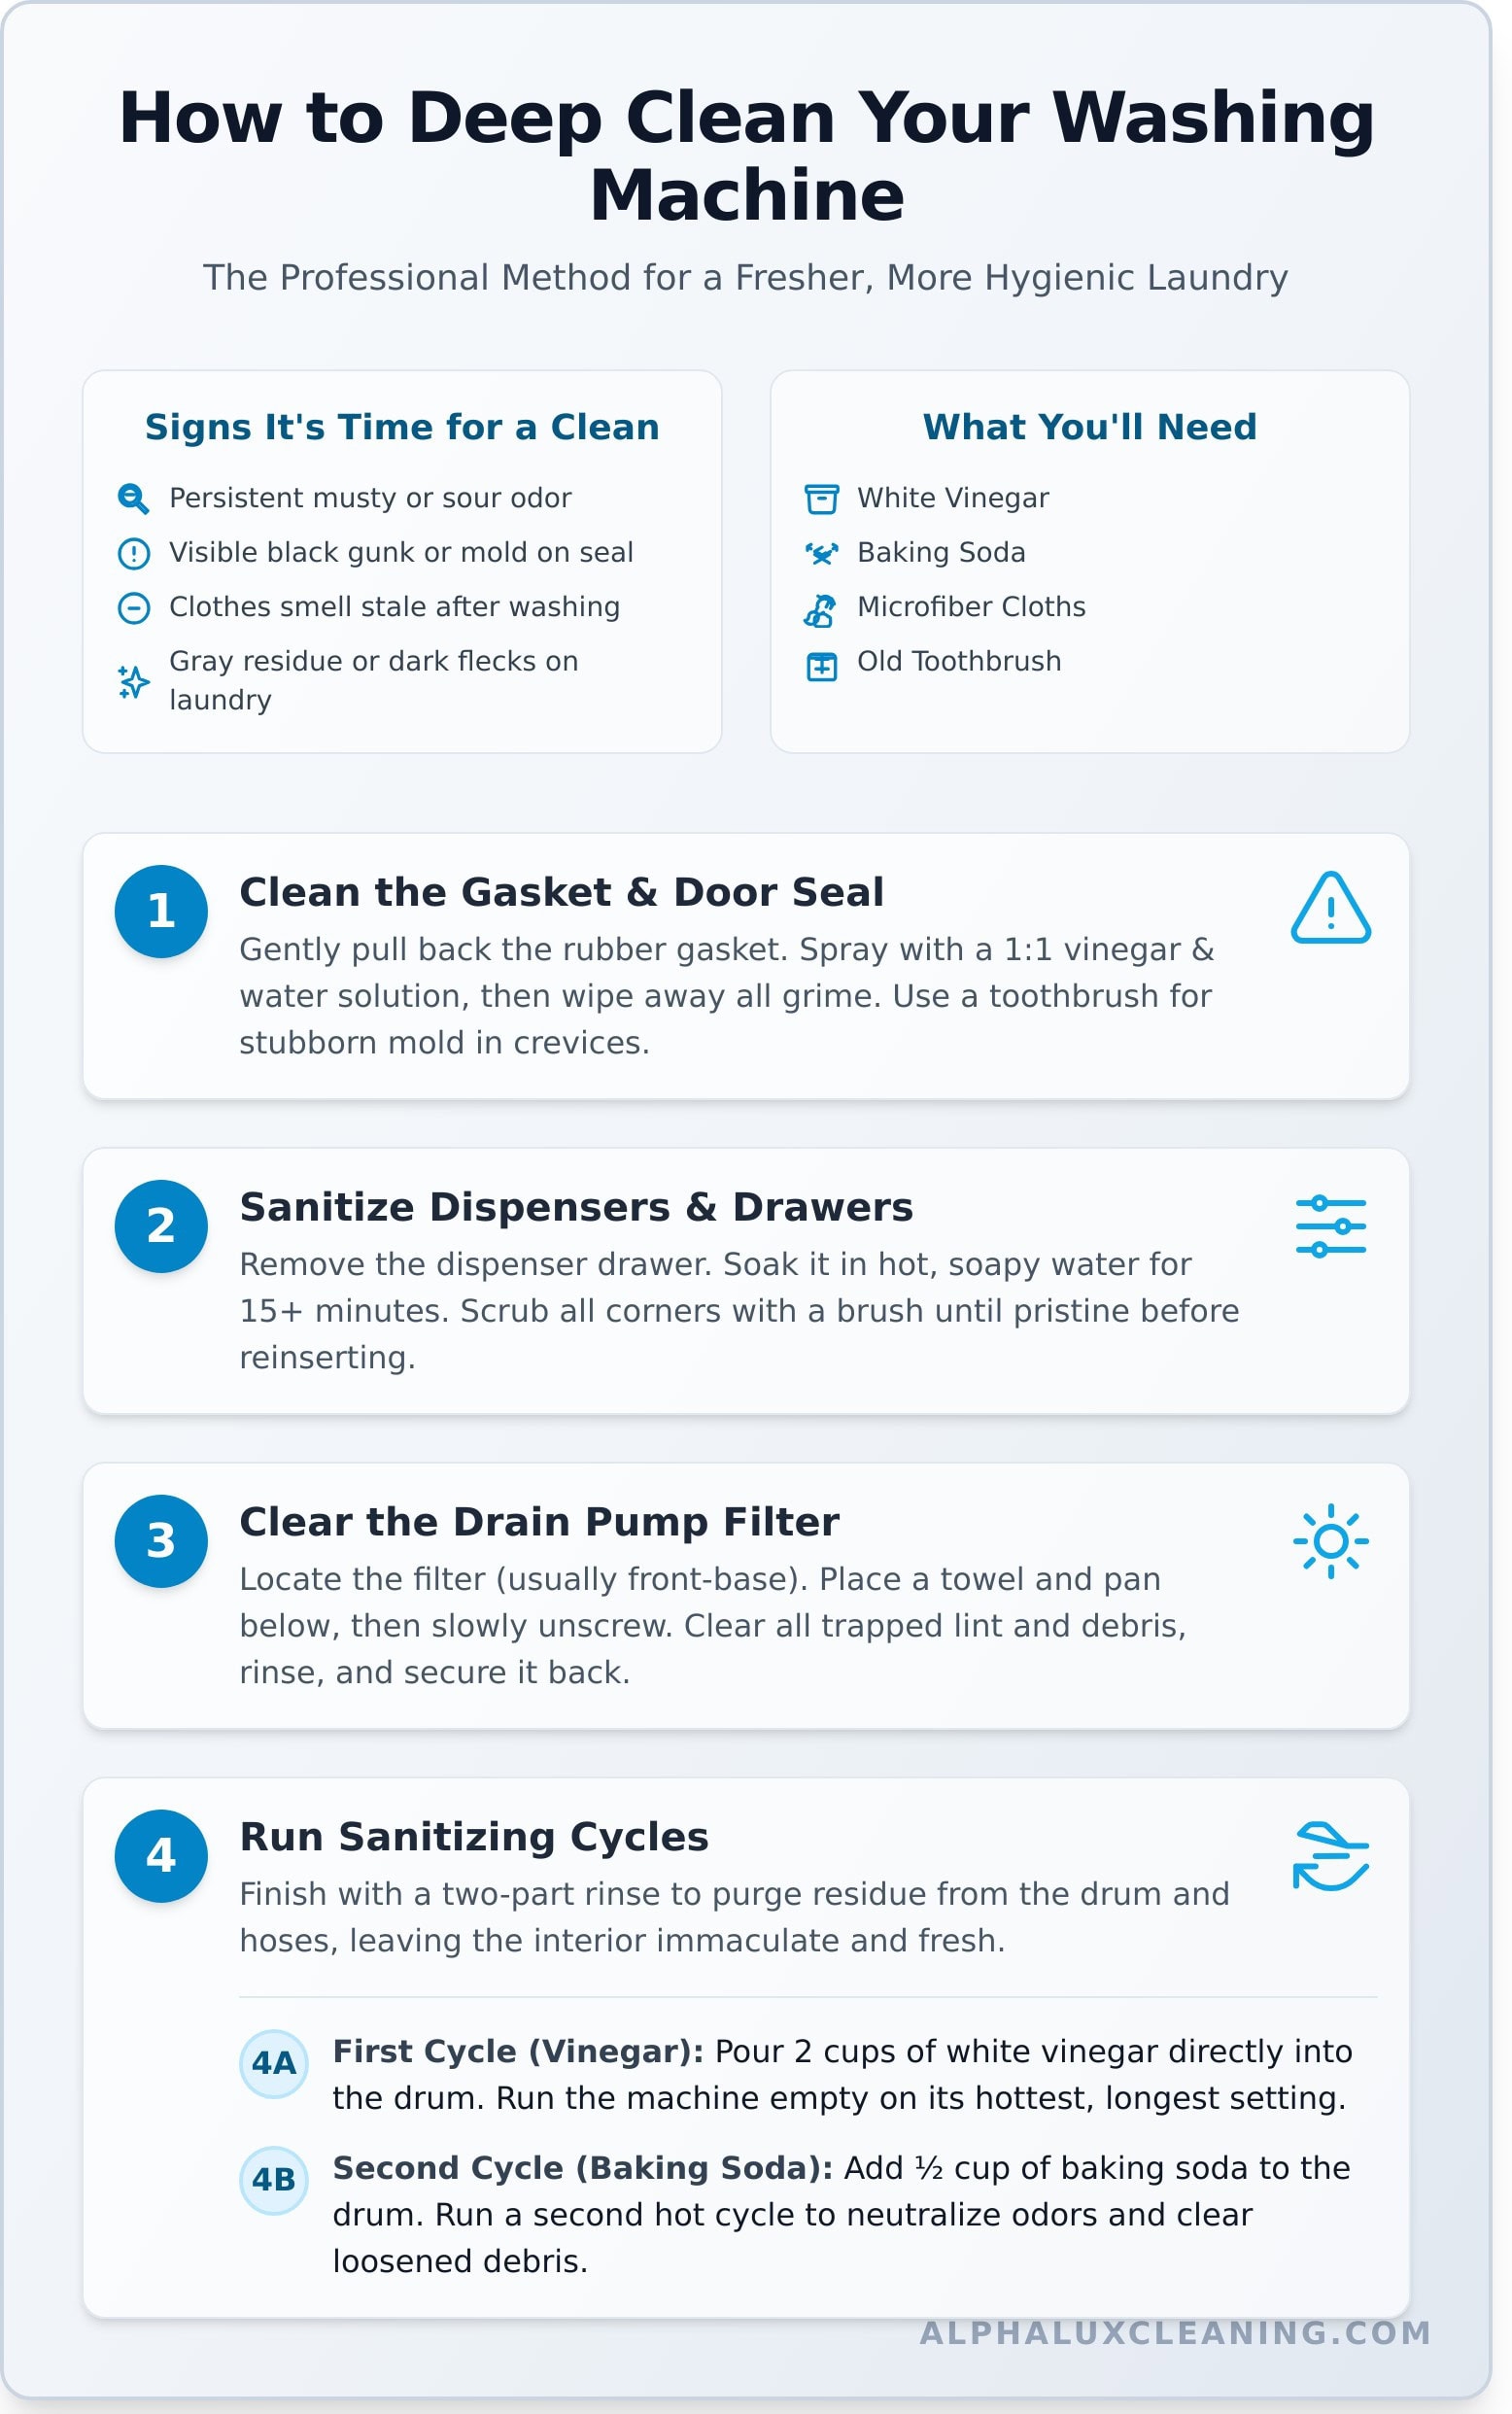
To achieve a truly spotless wash, you must start with a pristine machine. This professional guide details exactly how to clean a washing machine from top to bottom, ensuring every component-from the hidden filter to the inner drum-is meticulously sanitized. Before you begin, gather your essential tools: white vinegar, baking soda, two microfiber cloths, and an old toothbrush. Set aside about an hour to restore your appliance to peak performance, giving you peace of mind with every load.
Step 1: Address the Gasket and Door Seal
For front-loading machines, the rubber door seal is a primary culprit for trapping moisture and grime. Gently pull back the gasket and spray its interior thoroughly with a 1:1 solution of white vinegar and water. Allow it to sit for a moment before wiping away all residue with a clean microfiber cloth. For any stubborn mold or buildup in the crevices, a toothbrush provides the precision needed for a spotless finish.
Step 2: Sanitize Dispensers and Drawers
Detergent and fabric softener residue can build up, hindering performance and causing odors. Carefully remove the dispenser drawer, following your manufacturer’s instructions. Submerge the drawer in a basin of hot, soapy water for at least 15 minutes to loosen buildup. Use a small brush to scrub every corner until it’s pristine. Before reinserting it, wipe the inside of the drawer cavity to remove any lingering grime.
Step 3: Clear the Drain Pump Filter
This often-overlooked component traps lint, hair, and forgotten items from pockets. Consult your owner’s manual to locate the filter, which is typically behind a small access door on the machine’s front base. For more general guidance, you can find expert maintenance tips for your washer from trusted sources. Place a shallow pan and a towel underneath to catch any residual water, then slowly unscrew the cap. Remove the filter, clear away all debris, and rinse it thoroughly under hot water before securing it back in place.
Step 4: Run High-Heat Sanitizing Cycles
The final step in our guide on how to clean a washing machine involves a powerful two-part rinse. This process purges any remaining residue from the drum and hoses, leaving the interior immaculate.
- First Cycle (Vinegar): Pour two cups of white vinegar directly into the washer drum. Run the machine empty on its hottest, longest setting, such as a ‘Sanitize’ or ‘Clean Washer’ cycle. The vinegar will break down mineral deposits and kill mold.
- Second Cycle (Baking Soda): Once the first cycle is complete, add a half-cup of baking soda to the drum. Run a second hot cycle. This will neutralize any lingering odors and wash away the debris loosened by the vinegar, leaving your machine smelling fresh and truly clean.
Cleaning Top-Load vs. Front-Load Washing Machines: Key Differences
While the objective-a spotless, fresh-smelling appliance-is universal, the strategy for how to clean a washing machine depends entirely on its design. Front-loading and top-loading models each present unique challenges. A front-loader’s airtight seal can trap moisture and create a haven for mold, while a top-loader may accumulate soap scum and grime in less obvious places. Tailoring your approach with precision and care ensures a truly effective clean that doesn’t just look good, but feels pristine.
Focus Points for Front-Loading Machines
The primary battle with a front-loader is against moisture and the mildew it invites. Because the door seals so tightly, a meticulous and consistent routine is your best defense for keeping musty odors at bay.
- Prioritize the Gasket: The rubber door seal is the most common trouble spot. Once a month, gently pull it back and thoroughly wipe away any trapped lint, hair, or residue with a damp cloth.
- Use HE Detergent Exclusively: High-Efficiency (HE) detergents are formulated to produce fewer suds. Using anything else can leave behind a film that encourages grime buildup and can even damage your machine.
- Promote Airflow: After each wash cycle, leave the door and the detergent dispenser drawer slightly ajar. This simple habit allows air to circulate and dry out the interior, preventing odors from developing.
Focus Points for Top-Loading Machines
Top-loading machines are prone to a gradual buildup of detergent residue and hard water deposits along the upper portion of the drum. Your focus here is on dissolving this hidden grime for a complete clean.
- Dissolve Hidden Grime: The vinegar and baking soda cycles are particularly effective for soaking and breaking down unseen buildup within the tub and hoses.
- Address the Top Rim: Use a cloth to carefully wipe around the top edge of the washtub. This is an often-overlooked area where scum and lint can easily accumulate.
- Leverage Self-Clean Cycles: Many newer top-loaders feature a dedicated self-clean cycle. We recommend following your manufacturer’s instructions and using this feature regularly for optimal maintenance.
Understanding these key differences is the secret to mastering how to clean a washing machine effectively. By focusing on the specific needs of your appliance, you elevate a simple chore into a professional maintenance routine, ensuring your machine performs flawlessly and your clothes receive the care they deserve. For those who prefer to leave the details to trusted experts, AlphaLux Cleaning provides thorough home services that deliver peace of mind.
Expert Maintenance: How to Keep Your Washing Machine Fresh
A deep clean provides a necessary reset for your appliance, but the true secret to a consistently fresh washer lies in proactive, preventative care. By adopting a few simple habits, you can prevent the buildup of soap scum, mildew, and odors before they become a problem. This routine maintenance is the key to protecting your investment, ensuring your clothes always come out smelling pristine, and making laundry day a more pleasant experience.
Integrating these steps into your schedule transforms appliance care from a major chore into a simple, manageable habit. While understanding how to clean a washing machine is crucial for tackling existing issues, these maintenance tips are designed to keep those issues from returning.
Your Monthly Maintenance Checklist
Once a month, take just a few minutes to perform this quick, professional-grade check-up. This simple ritual ensures your machine runs efficiently and odor-free, safeguarding the quality of every wash.
- Run a Refresh Cycle: Pour one cup of white vinegar into the drum and run an empty, hot water cycle to dissolve mineral deposits and soap residue.
- Wipe the Gasket: For front-loading machines, carefully wipe down the rubber door seal (the gasket) with a damp cloth to remove trapped moisture and lint.
- Check the Drain Pump Filter: Quickly check and rinse the filter to clear away any debris that could impede drainage and cause odors.
- Clean the Exterior: Give the outside of your machine a wipe-down with an all-purpose cleaner to keep it looking spotless.
Best Practices for Everyday Laundry
The small details of your daily routine have the biggest impact over time. These best practices are the foundation of a clean, efficient washing machine and will dramatically reduce the need for intensive deep cleans.
- Measure Your Detergent: Using too much detergent creates excess suds that leave behind a residue-a perfect breeding ground for mildew. Always follow the manufacturer’s recommendation.
- Remove Clothes Promptly: Don’t let wet clothes sit in the washer. Transferring them to the dryer immediately prevents a damp, musty environment from developing.
- Leave the Door Open: After every wash, leave the door or lid ajar. This simple step allows air to circulate, drying out the interior and preventing mildew growth.
This meticulous approach to maintenance ensures your washing machine-and your laundry-remains impeccably clean. Want this level of thorough care for your whole home, giving you complete peace of mind? Explore our Deep Cleaning services.
Elevate Your Clean, From Your Washer to Your Entire Home
Mastering how to clean a washing machine is a powerful step toward a healthier, more efficient home. By following this guide, you now understand that regular, thorough cleaning is essential for preventing odors and buildup, regardless of whether you own a top-load or front-load model. Consistent maintenance not only protects your investment but ensures every load of laundry emerges as fresh as possible.
That dedication to a truly deep clean is the standard we uphold at AlphaLux. When you’re ready to extend that pristine feeling to your entire living space, trust our vetted, trained, and insured cleaning professionals to deliver exceptional results. With a commitment to non-toxic, eco-friendly products, we help you experience a higher standard of clean that you can feel.
When you want your entire home to not just look clean, but feel clean, book a professional Deep Cleaning service with AlphaLux.
Enjoy the peace of mind that comes with a truly spotless home.
Frequently Asked Questions
How often should I clean my washing machine?
For optimal performance and truly fresh laundry, we recommend a thorough cleaning once a month. This regular maintenance prevents the buildup of soap scum, mineral deposits, and mold that can transfer to your clothes. If you have a large family, use your machine frequently, or live in a hard-water area, you may benefit from cleaning it every three weeks. A consistent schedule is key to a machine that doesn’t just look clean, but feels clean.
Can I use bleach to clean my washing machine instead of vinegar?
While bleach is a powerful disinfectant effective against mold, it is not ideal for removing soap scum or hard water deposits. Vinegar excels at dissolving these buildups. Before using bleach, always consult your machine’s manual, as some manufacturers advise against it. It is a suitable option for sanitizing, but for a comprehensive clean that tackles mineral deposits, vinegar is often the more thorough choice. Never mix bleach and vinegar, as this creates dangerous chlorine gas.
What’s the difference between cleaning with vinegar and using a commercial tablet like Affresh?
Vinegar is an excellent, natural solution for dissolving mineral deposits and soap scum. Commercial tablets like Affresh are specifically formulated with surfactants and oxygen-based bleaching agents to break down a wider range of residues and eliminate odors. While vinegar is a cost-effective DIY method, tablets offer a convenient, pre-measured, and targeted cleaning performance designed by appliance experts. Both are effective, so the choice often comes down to personal preference and convenience.
Is it safe to mix vinegar and baking soda together in the washing machine?
While it is safe to use both in your machine, mixing them together at the same time is not effective. When combined, vinegar (an acid) and baking soda (a base) neutralize each other, creating mostly water and diminishing their cleaning power. For a more thorough result, use them sequentially. Start a cycle with baking soda to scrub and deodorize the drum, then run a separate cycle with vinegar to dissolve residue and rinse the machine clean.
What causes the black, greasy stains on my clothes after washing?
Those frustrating black or greasy marks are typically caused by a buildup of detergent, fabric softener, and body oils inside your washer’s drum and seals. This residue forms a grimy biofilm that can flake off during a wash cycle and transfer onto your clothes. It’s a clear sign that your machine is overdue for a deep cleaning to remove this stubborn buildup. Regularly cleaning the gasket and running a hot maintenance cycle can prevent this problem from recurring.
My washing machine still smells after cleaning it. What should I do next?
If a musty odor lingers, it’s time to inspect the hidden spots. Thoroughly clean the detergent dispenser, the drain pump filter, and deep within the folds of the rubber door seal, as these areas trap moisture and breed mildew. The most detailed guide on how to clean a washing machine will always include these steps. If the smell persists, running a second hot cycle with a commercial washer cleaner or a small amount of bleach (if manufacturer-approved) can eliminate any remaining bacteria.