Airbnb Cleaning for Superhosts: The 2026 Guide to 5-Star Turnovers
Could a single overlooked detail in your guest suite be the difference between a glowing review and a 4-star setback? For those managing high-end…
6 Eco Friendly Carpet Cleaning Service Picks In New York
Most carpet cleaning companies rely on harsh chemicals that leave behind strong fumes and chemical residues, not exactly what you want your kids or pets rolling around on. If you’ve been searching for an eco friendly carpet cleaning service in New York, you’re already making a smart choice. But finding one that actually delivers results without cutting corners on sustainability can take some real digging. At AlphaLux Cleaning, we use non-toxic, eco-friendly products across all our residential and commercial cleaning services because we believe a clean space shouldn’t come at the cost of your health or the environment. It’s a standard we hold ourselves to, and one we respect in other companies doing the same work. We put together this list of six eco-friendly carpet cleaning services operating in New York that prioritize safe, sustainable methods. Whether you need a one-time deep clean or regular maintenance, these picks will help you find a provider that aligns with your values, and still gets the dirt out. 1. AlphaLux Cleaning AlphaLux Cleaning operates across New York State and brings its commitment to safe, sustainable products directly into carpet care. If you want an eco friendly carpet cleaning service that can also handle your deep cleaning, move-in/move-out prep, or regular home maintenance all under one booking, AlphaLux makes that straightforward. Service area and scheduling Serving residential and commercial clients throughout New York, with a strong presence on Long Island, AlphaLux gives you multiple ways to get started. You can book online or request a free estimate through their website, and scheduling includes flexible options like one-time appointments and recurring plans on a weekly or monthly basis. How their eco-friendly approach fits carpet care Non-toxic, eco-friendly products are standard across every AlphaLux service, and carpet cleaning is no exception. Their trained staff work through stains, odors, and embedded dirt without reaching for harsh solvents that leave chemical residues sitting in the fibers your family walks and sits on every day. Carpets cleaned with non-toxic products protect more than your floors; they protect the air quality in your home long after the crew leaves. What to ask before you book Before you confirm, ask specifically about the cleaning products used for your carpet type and whether the team adjusts their approach for high-pile or delicate rugs. You should also clarify what equipment they bring and what, if anything, you need to prepare beforehand. Ask about pre-treatment options for heavy staining or pet odors Confirm expected drying times for your specific space Ask whether bundling services changes the scope or pricing Best fit and limitations You’ll get the most value from AlphaLux if you want one trusted provider covering carpet cleaning alongside other home or office cleaning needs. For highly specialized restoration on antique or fragile rugs, a dedicated rug restoration specialist may be more appropriate. Pricing and what affects cost Pricing at AlphaLux starts with a free estimate, so you know what to expect before any work begins. The main cost factors include the total carpeted area, the level of soiling, and whether stain pre-treatment is required. Bundling carpet cleaning with other services often brings the overall cost down. 2. Green Choice Carpet Cleaning Green Choice Carpet Cleaning focuses specifically on green cleaning methods and non-toxic product standards across all their carpet services in New York, making them a strong pick if sustainability is non-negotiable for you. Service area and scheduling Green Choice primarily serves New York City and the surrounding metro area, including the five boroughs and parts of Long Island. You can book online or by phone, and same-day or next-day appointments are often available depending on your location and schedule. Cleaning method and product standards Their process combines hot water extraction with plant-based, biodegradable cleaning agents certified safe for children and pets. As a dedicated eco friendly carpet cleaning service, Green Choice avoids phosphates, synthetic fragrances, and solvents throughout their product line. Asking a company to name the specific products they use is the fastest way to verify whether their green claims hold up. Dry time and disruption Carpets typically dry within two to four hours, which is standard for hot water extraction methods. Their team uses high-powered extraction equipment to pull out as much moisture as possible before leaving your space, which keeps disruption minimal. Best fit and limitations Green Choice fits best for NYC metro residents who want a specialized carpet cleaner with a clear non-toxic focus. If you need bundled cleaning services beyond carpets, you will likely need a separate provider to cover the rest of your home or office. Pricing and what affects cost Quotes are based on room count or square footage, with additional charges for heavy staining or pet odors. They provide pricing upfront, so no unexpected costs appear on your final bill. 3. Stanley Steemer Stanley Steemer is one of the most widely recognized carpet cleaning companies in the United States, and their New York presence brings that national infrastructure directly to local homes and businesses looking for reliable, professional service. Service area and scheduling Stanley Steemer covers multiple New York locations, including NYC, Long Island, and surrounding areas. You can schedule online, through their mobile app, or by phone, and same-day appointments are available in many zones depending on current availability and your location. Cleaning method and product standards Their primary method is hot water extraction, which pulls deep-seated dirt and allergens out of carpet fibers effectively. For anyone searching for an eco friendly carpet cleaning service, Stanley Steemer offers Green Certified cleaning solutions as a selectable option alongside their standard products, so ask for it specifically when you book rather than assuming it comes standard. Always confirm you want the green-certified product option at the time of booking, not after the crew arrives. Dry time and disruption Carpets typically dry within four to six hours after a Stanley Steemer appointment. Their trucks carry high-powered extraction equipment that removes most of the moisture during the process, which keeps disruption manageable for most households
Premium Office Cleaning Services in Queens, NY: Elevate Your Workspace
What if the most effective tool for increasing your team’s productivity wasn’t a new project management app, but the very environment where they…
Deep Cleans, Move-Outs, and Routine Polish: Choosing the Right Cleaning Service Package for Long Island
Post Construction Cleaning Service: What It Includes & Cost
You just wrapped up a renovation or construction project, and the results look great, until you notice the layer of fine dust coating every surface, drywall residue in corners, and adhesive smudges on your new windows. This is exactly where a post construction cleaning service comes in. It’s a specialized cleaning process designed to remove construction debris, dust, and residue so your space is actually livable or ready for business. The problem is, construction mess isn’t like everyday dirt. Drywall dust gets into air vents. Grout haze clings to tile. Paint splatter hides on trim and baseboards. Standard cleaning methods won’t cut it, and doing it yourself can take days, sometimes longer. A professional crew with the right tools and process can handle it far more efficiently and thoroughly. At AlphaLux Cleaning, we help homeowners and businesses across New York get their spaces move-in ready after construction and renovation work. In this guide, we’ll break down what post construction cleaning actually includes, how much it typically costs, and what to look for when hiring a service. Why post-construction cleaning matters After any construction or renovation project, the visible debris is only part of the problem. Fine particles from drywall, concrete, and insulation settle into surfaces, air vents, and corners long after the contractors have packed up. These aren’t just cosmetic issues. They create real health risks and can damage your newly finished materials if you don’t address them right away. The health risks from construction dust Construction dust isn’t ordinary household dust. Silica dust from concrete and masonry work is a documented respiratory hazard, and drywall dust, fiberglass particles, and chemical residue from adhesives and sealants can all irritate airways, eyes, and skin. If you move into a newly renovated space without a thorough cleanup, everyone inside the building is breathing those particles in every single day. According to the Occupational Safety and Health Administration (OSHA), silica dust is a serious workplace health hazard associated with long-term, irreversible lung damage. Ventilation systems are another concern. Dust that gets pulled into HVAC ducts during construction will circulate through your space for weeks after you move in, spreading particles to every room unless the vents are cleaned as part of the post-construction process. Protecting your new finishes Beyond health, there’s a practical reason to clean before you move in or reopen. Dust and grit left on floors act like sandpaper underfoot, which can scratch hardwood, scuff tile, and permanently dull grout lines. Window glass with dried adhesive or paint overspray becomes harder to remove the longer it sits without attention. Delaying a proper cleanup puts your investment at risk. Here’s what gets damaged when construction residue is left too long: Hardwood floors: surface scratches from tracked-in grit Tile and grout: haze that bonds to the surface and becomes difficult to lift Windows and glass: adhesive residue that etches into the surface over time HVAC filters: rapid clogging from fine dust particles What post-construction cleaning includes A professional post construction cleaning service covers far more than sweeping up sawdust. Crews work through the space systematically, tackling everything from ceiling-level debris to floor-level residue that standard residential cleaning equipment simply can’t handle. The process typically breaks into several distinct tasks, each targeting a different type of construction mess. Surface and fixture cleaning Every horizontal and vertical surface gets attention during this phase. Workers scrub walls, wipe down cabinets, and remove paint splatter from trim, fixtures, and hardware. Windows receive a full cleaning inside and out to strip adhesive stickers, paint overspray, and the film that construction activity leaves behind. A single renovation project can leave paint, caulk, and adhesive residue on more than a dozen different surface types throughout the space. Floors and final touches Floor cleaning in a post-construction context goes well beyond mopping. Crews remove grout haze from tile, buff out scuffs from hardwood, and vacuum thoroughly to pull embedded grit before it scratches the surface. Vents, light fixtures, and electrical outlets also get wiped down to clear the fine dust that collects in recessed areas throughout the build. This final pass ensures your new space is truly ready for use, not just visually clean on the surface. Post-construction cleaning checklist by area When you hire a post construction cleaning service, knowing what areas get covered helps you verify the job is done right. Every zone in your space has its own type of residue and requires a different approach. Interior rooms and living spaces Bedrooms, hallways, and living areas collect fine dust on every surface during construction. Workers focus on wiping down walls, cleaning light fixtures, vacuuming vents, and removing debris from window tracks and sills. Walls and baseboards wiped clean Ceiling fans and light fixtures dusted Window sills, tracks, and glass cleaned Vents and returns cleared of dust buildup Floors vacuumed and mopped thoroughly Kitchens and bathrooms These rooms require extra attention because adhesive residue, grout haze, and caulk smears tend to concentrate here. Crews clean inside cabinets, scrub countertops, and address tile surfaces that need grout haze removal. Grout haze left on tile for more than a few weeks can bond permanently, making it far harder to remove later. Fixtures, faucets, and hardware get polished after removing any protective coverings left behind by contractors, leaving the space genuinely ready to use. How the service works from start to finish Booking a post construction cleaning service follows a clear, predictable process. Most professional crews start with a walkthrough of the space to assess the scope of work, note any problem areas, and confirm which materials need special treatment before the job begins. Initial assessment The walkthrough gives the cleaning crew a full picture of what the project involves. They identify surfaces with heavy residue, flag areas needing delicate handling, and build a room-by-room plan so nothing gets missed once the work starts. Surface types that need special products Areas with heavy dust or debris buildup Fixtures still covered by contractor protection Cleaning day On cleaning day, the crew works
Post Construction Cleaning Equipment List: The Professional’s Guide for 2026

Your standard shop vac isn’t just failing to clean your new renovation; it’s likely recirculating microscopic silica dust that can linger in the air…
How To Clean Inside Windows Without Streaks (Step-By-Step)
You cleaned your windows, stepped back to admire the results, and now all you see are streaks catching the sunlight. Frustrating, right? Figuring out how to clean inside windows the right way isn’t complicated, but there’s a method to it, and most people skip the steps that actually matter. The good news is that a streak-free finish is completely achievable with a few simple tools and the right technique. At AlphaLux Cleaning, we clean interior windows across homes and businesses throughout New York every day. Our team knows exactly what works, what doesn’t, and why certain products leave residue behind. We put this guide together based on the methods our professionals actually use on the job, not recycled tips from the back of a spray bottle. Below, you’ll find a clear, step-by-step process for cleaning your inside windows and tracks, from choosing the right solution to the final wipe-down. Whether you’re prepping for guests, handling a move-out, or just tired of looking through smudged glass, this guide will get you there. What you need before you start Having the right supplies ready before you start makes the entire process faster and more effective. Gathering everything upfront means you won’t have to stop mid-clean to hunt for a cloth or run to the store. For anyone serious about learning how to clean inside windows without leaving streaks, setup is half the job. Cleaning solutions The solution you choose directly affects your results. Dish soap mixed with warm water (a few drops per gallon) is one of the most reliable options for cutting through grime. If you prefer something store-bought, a dedicated glass cleaner works well, but avoid anything with bleach or heavy fragrance since those tend to leave residue behind. Skip multi-purpose sprays on glass. Most of them contain ingredients that evaporate unevenly and leave a film on the surface. You can also make a DIY solution using distilled white vinegar and distilled water in a 1:1 ratio. Tap water contains minerals that cause spots, so using distilled water is worth the extra step if you want a truly clean finish. Tools and supplies Your tools matter just as much as your cleaning solution. A microfiber cloth or a lint-free cloth is the most important item on this list since paper towels leave fibers on the glass. A rubber-bladed squeegee is optional, but it dramatically speeds up the process on larger windows and reduces the chance of streaking. Here’s a quick checklist of what to have ready before you begin: Two microfiber cloths (one for washing, one for drying) A squeegee with a clean rubber blade A bucket or spray bottle Your cleaning solution (DIY or store-bought) A dry cloth or old toothbrush for tracks and frames Cotton swabs for tight corners Having everything laid out before you begin keeps the process smooth and prevents you from rushing. Rushing is the most common reason streaks appear in the first place. Step 1. Pick the right day and prep Timing matters more than most people expect when figuring out how to clean inside windows. Direct sunlight hitting the glass causes your cleaning solution to dry too fast, which is the single biggest cause of streaks even when you use the right technique and the right products. Choose the right lighting conditions Pick a cloudy day or a shaded time of day for this task. If it’s bright outside, start with windows on the shaded side of your home first. Morning or late afternoon works much better than midday sun, and it makes it easier to spot any missed spots or smears before you move on to the next window. Avoid cleaning windows in direct sunlight. The heat evaporates your solution before you get a chance to wipe it away cleanly. Prep the space before you touch the glass Move any furniture, blinds, or plants away from the window before you start. Lay a dry towel along the sill and floor below to catch any drips. Then remove loose dust and debris from the glass surface using a dry microfiber cloth or a soft brush. Skipping this step means you are pushing dry dirt around in your solution rather than lifting it off the glass entirely. Step 2. Clean tracks, sills, and frames Most people jump straight to the glass and skip this step entirely. That’s a mistake. Dirty tracks and frames release grime onto your freshly cleaned glass every time you open or close the window, undoing your work immediately. Clear out the tracks first The window tracks collect dust, dead insects, and compacted debris that a cloth alone won’t remove. Start by running a dry toothbrush or cotton swab along each track to break up the buildup. Then use your vacuum’s brush attachment to pull out the loosened debris before applying any liquid. Don’t apply cleaning solution to tracks before vacuuming them out. Wet debris turns into a muddy paste that’s harder to remove than dry dirt. Once the loose debris is gone, dip a cotton swab in your cleaning solution and run it through the track grooves. For stubborn spots, a flat-head screwdriver wrapped in a damp cloth fits neatly into the narrow channels without scratching them. Wipe down sills and frames After the tracks are clear, wipe the sill and frame with a damp microfiber cloth using your cleaning solution. Work from top to bottom so drips don’t land on areas you’ve already cleaned. Knowing how to clean inside windows properly means treating the entire window unit, not just the glass itself. Step 3. Wash the glass without streaks Now that the tracks and frames are clean, you can focus on the glass itself. How to clean inside windows without streaks comes down to two things: how you apply the solution and how you wipe it away. Most streaks happen because people spray too much product or move the cloth in random directions. Apply the solution correctly Spray your cleaning solution onto your microfiber cloth rather than directly
Pristine Beginnings: The Essential Guide to Move-In Cleaning for Apartments on Long Island

Would you feel comfortable sleeping on a mattress used by a stranger without changing the sheets? Most people wouldn’t, yet many move into new homes without addressing the invisible history left behind by previous occupants. Transitioning into a new space is an exciting milestone, but the reality of a previous tenant’s hygiene often lingers beneath the surface. You’ve likely spent weeks coordinating logistics and managing work schedules, only to find yourself staring at a “broom-clean” kitchen that doesn’t quite meet your standards for a fresh start. Investing in professional move in cleaning for apartments long island offers more than just a visual refresh; it provides the essential foundation for your new life. We understand that your time is your most valuable asset during a move. You shouldn’t have to spend your first night scrubbing baseboards or worrying about management company insurance requirements. Discover how a professional move-in clean transforms your new Long Island apartment into a healthy, stress-free sanctuary before you unpack a single box. This guide explores the tangible benefits of deep sanitization, the logistics of a hands-off experience, and how to ensure your new home is truly ready for your family’s arrival. What You Will Learn in This Guide Entering a new apartment should be a moment of joy, not a source of hygiene anxiety. This comprehensive guide details how professional move in cleaning for apartments long island provides the essential foundation for a healthy and organized life. You will learn why visual cleanliness is often deceptive and how specialized sanitization techniques address the hidden “stranger residue” that standard cleaning overlooks. We provide a deep-dive into the professional checklist, covering everything from interior appliance degreasing to meticulous bathroom sterilization to ensure your home is truly guest-ready. We also examine the practical side of your transition, comparing the 12-hour reality of a DIY deep clean against the efficiency of commercial-grade equipment. For those moving into managed complexes in Nassau or Suffolk, we explain how to navigate logistical hurdles like Certificate of Insurance (COI) requirements and elevator bookings. Finally, see how a commitment to eco-friendly, non-toxic cleaning solutions creates a safe environment for your family and pets. This article ensures you have all the information needed to reclaim your time and settle into a truly pristine Long Island sanctuary with total peace of mind. Table of Contents The Health and Wellness Case for Professional Move-In Cleaning The Move-In Cleaning Checklist: What a Professional Service Covers DIY vs. Professional Move-In Cleaning: A Cost-Benefit Analysis Navigating Long Island Apartment Move-In Logistics Choosing AlphaLux for a Seamless Long Island Apartment Transition The Health and Wellness Case for Professional Move-In Cleaning Most apartment leases on Long Island require tenants to leave their units in “broom-clean” condition. While this sounds acceptable on paper, it often means the previous occupant simply swept the floors and wiped down the counters with a damp cloth. This creates a gap between visual order and true biological safety. Professional move in cleaning for apartments long island bridges this gap by treating the space as a clinical environment that requires deep sanitization. It’s about removing the “stranger residue” that lingers in every corner, from the microscopic skin cells in the carpet to the biological traces on the bathroom vanity. Visual cleanliness is frequently deceptive. A floor might shine, but it can still harbor a history of allergens and pathogens. When you step into a new home, you’re also stepping into the environment left behind by the previous family, their pets, and their lifestyle habits. A specialized move-in service focuses on high-touch surfaces that standard cleanings often overlook, ensuring that your first night in your new home is spent in a space that is genuinely healthy, not just tidy. Beyond the Surface: Sanitizing for Your Health True health in a living space begins with the air you breathe and the surfaces you touch dozens of times a day. Professional teams prioritize the disinfection of light switches, door handles, and thermostats, which are notorious hotspots for bacteria. We also address the health risks of household dust, which can contain a cocktail of pet dander, pollen, and dust mites from previous years. Utilizing industrial HEPA filtration during the vacuuming process is essential because it captures these microscopic particles rather than releasing them back into the air. By choosing eco-friendly, non-toxic products, you ensure that your apartment is safe for immediate occupancy, protecting your family and pets from harsh chemical residues while achieving a superior level of cleanliness. The Emotional Relief of a Ready-to-Live Space The psychological impact of a pristine environment cannot be overstated. Moving is widely recognized as one of life’s most significant stressors, involving endless logistics and physical exhaustion. Removing “cleaning” from your personal to-do list provides immediate emotional relief, allowing you to focus on the joy of settling in. There is a profound sensory experience in walking into a home that smells faintly of fresh, natural citrus rather than stale air or old cooking odors. Framing professional cleaning as an investment in your mental clarity transforms it from a luxury into a vital component of a balanced life. You aren’t just buying a service; you’re securing the peace of mind that comes from knowing your new sanctuary is truly your own. The Move-In Cleaning Checklist: What a Professional Service Covers A truly pristine beginning requires more than a quick wipe down. It demands a systematic approach that addresses every square inch of your new residence. While a standard cleaning focuses on maintaining an already tidy space, a professional move in cleaning for apartments long island is a comprehensive restoration of the property. This process targets the layers of dust and grime that accumulate during the vacancy period and the previous tenant’s residency. By following a meticulous checklist, professional teams ensure that you aren’t just moving into a house, but into a carefully prepared sanctuary. Kitchen and Appliance Detailing The kitchen is the heart of the home, but it’s also where grease and food particles hide in plain sight. A professional
Apartment Cleaning Service: Costs, Checklist, And How To Hire
Hiring an apartment cleaning service sounds simple enough, until you start comparing quotes, reading fine print, and wondering what’s actually included. Whether you rent a studio in Manhattan or own a two-bedroom in Long Island, the difference between a mediocre clean and a thorough one often comes down to knowing what to look for before you book. Apartment cleaning isn’t the same as cleaning a house. Spaces are tighter, layouts vary wildly, and buildings sometimes have rules about access, scheduling, and products used. A good cleaning service understands these details. At AlphaLux Cleaning, we handle apartments across New York with eco-friendly products and trained, background-checked professionals, so we know firsthand what goes into getting it right and what it should cost. This guide breaks down real pricing for apartment cleaning services, gives you a room-by-room checklist so you know exactly what to expect, and walks you through how to hire a provider you can actually trust. Whether you need a one-time deep clean before moving out or a recurring service to keep your space fresh, you’ll leave this page with everything you need to make a confident decision. Why hire an apartment cleaning service Most people who hire a cleaning service don’t do it because they can’t clean. They do it because time is limited and the trade-off makes clear sense. When you work full-time, manage a household, and try to hold on to some personal time, spending your weekend scrubbing grout and sanitizing bathrooms isn’t just unpleasant. It’s a real cost. Hiring a professional lets you reclaim those hours and redirect them toward things that actually matter to you. Your time has a real dollar value Think about how long it takes to clean your apartment properly. A two-bedroom can easily take three to four hours if you’re doing it right: wiping down surfaces, cleaning inside appliances, mopping floors, scrubbing tile. If your time is worth $40 an hour, that’s $120 to $160 in personal time you’re spending on a task someone else can handle for roughly the same amount. The math alone makes a strong case for outsourcing it. Hiring a cleaning service isn’t a luxury. For most working adults, it’s a straightforward trade of money for time, and the time is usually worth more. When you factor in the cost of cleaning supplies and equipment, plus the physical effort involved, the gap between doing it yourself and hiring a professional becomes even smaller than most people expect. Professional results are harder to replicate than they look There’s a difference between a surface that looks clean and one that actually is. Professional cleaners follow structured processes and use products that break down buildup your regular routine likely misses. Grout lines, behind appliances, under furniture, and inside cabinets collect grime fast but get skipped in most casual cleaning sessions. A trained cleaner works through a consistent checklist so nothing gets overlooked. Booking recurring visits also means you’re not relying on your own motivation or free schedule to keep your apartment in good shape. The cleaner shows up, does the work, and leaves your space in the same reliable condition every single time. Health benefits go beyond a tidy space Dust, allergens, and mold spores build up in apartments faster than most people realize, especially in tightly sealed buildings with limited airflow. Regular professional cleaning reduces concentrations of allergens like dust mites and pet dander, which directly affects air quality and can ease symptoms for anyone dealing with asthma or seasonal allergies. A clean apartment isn’t just more comfortable; it’s measurably better for your health. Using non-toxic, eco-friendly products matters here too. Many conventional cleaning products leave behind chemical residue that lingers on surfaces and circulates in the air. A service that prioritizes safer ingredients, like AlphaLux Cleaning does, means your apartment gets genuinely clean without trading one health concern for another. What an apartment cleaning service includes Not every apartment cleaning service offers the same scope of work, so knowing what’s typically covered helps you book the right option and avoid surprises. Most services split their offerings into two main tiers: standard cleaning and deep cleaning, each with a different level of detail and a different price. Standard vs. deep cleaning A standard clean covers the tasks that keep your apartment consistently presentable between deeper sessions. It’s designed for apartments that are already in reasonable shape and works well on a weekly or biweekly schedule. A deep clean, by contrast, goes after the buildup your regular routine misses and takes significantly more time. Here’s a quick breakdown of what falls under each tier: Task Standard Deep Clean Wipe counters and surfaces Yes Yes Clean sinks, toilets, tubs Yes Yes Vacuum and mop floors Yes Yes Inside oven and refrigerator No Yes Scrub grout and baseboards No Yes Inside cabinets and drawers No Yes Ceiling fans and air vents No Yes A deep clean is the right starting point if your apartment hasn’t been professionally cleaned before, or if it’s been several months since the last thorough session. Move-in and move-out cleaning Move-in and move-out cleans are a specialized version of deep cleaning designed to leave an apartment in spotless condition for the next occupant or to help you recover your security deposit. These sessions cover everything a deep clean does, with extra attention to walls, window sills, door frames, and any areas that collect grime during long-term occupancy. Booking this type of service before handing over your keys removes a significant source of stress during an already demanding transition. If you’re relocating within New York, a professional move-out clean is one of the most practical investments you can make in the process. Apartment cleaning costs and pricing models Understanding what you’ll pay before booking an apartment cleaning service helps you compare providers fairly and avoid being caught off guard by extra charges. Most services use one of two pricing models: flat-rate pricing or hourly pricing, and knowing the difference before you book puts you in a much stronger
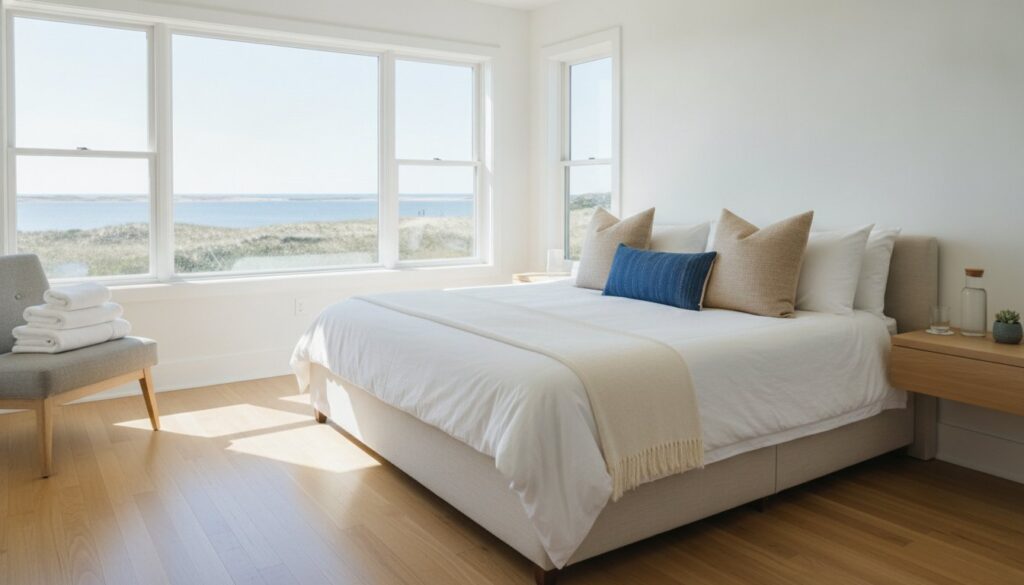
Deep Cleaning Your Apartment After Illness: A 2026 Guide to a Healthy Home
You finally wake up without a fever, yet as you look around your home, the air feels heavy and every surface seems like a potential source of re-infection. It’s an exhausting realization that the space where you should be recovering feels like the very thing keeping you from a full return to health. Most people feel a sense of dread at the prospect of a deep cleaning apartment after illness while their energy is still rebounding. It’s natural to worry that a simple wipe-down isn’t enough to protect your family or ensure that stale, lingering smell is truly gone. Restoring your home is about more than just aesthetics; it’s about biological safety and emotional relief. We’ve designed this guide to provide a professional, scientifically backed protocol to sanitize your living space effectively without relying on harsh, toxic fumes that can overwhelm smaller urban homes. You’ll learn the specific CDC-recommended disinfection steps for 2026, how to verify EPA-approved solutions for emerging pathogens, and the best methods to restore your indoor air quality so you can finally reclaim your sanctuary and your peace of mind. Key Takeaways Learn the essential three-tier hierarchy of home hygiene to distinguish between a simple visual clean and true biological sanitization. Identify and prioritize “invisible” touchpoints using the Zone Cleaning method, focusing on overlooked areas like thermostats and cabinet pulls. Understand the technical benefits of a professional deep cleaning apartment after illness, including the use of HEPA filtration to improve indoor air quality. Discover how botanical disinfectants provide a meticulous, hospital-grade clean without leaving behind the harsh chemical residues common in small spaces. Reclaim your physical energy and mental clarity by transitioning your home from a place of recovery back into a sensory sanctuary. Table of Contents Understanding the Difference: Cleaning, Sanitizing, and Disinfecting Your Space The High-Touch Protocol: Essential Areas to Sanitize After Being Sick DIY vs. Professional Deep Cleaning: Reclaiming Your Health and Time An Eco-Friendly Approach to Post-Illness Sanitization Restoring Sanctuary: Professional Post-Illness Cleaning in New York Understanding the Difference: Cleaning, Sanitizing, and Disinfecting Your Space A home that looks tidy isn’t necessarily a home that is healthy. After a bout of illness, the distinction between visual order and biological safety becomes a vital part of your recovery. Achieving a thorough deep cleaning apartment after illness requires a structured approach that moves beyond traditional dusting. In 2026, professional standards emphasize a three-tier hierarchy of hygiene: cleaning, sanitizing, and disinfecting. Each level serves a specific purpose in restoring your sanctuary. Because New York apartments often have compact floor plans and shared air systems, pathogens can settle in concentrated patterns on specific surfaces. Understanding the Difference: Cleaning, Sanitizing, and Disinfecting Your Space allows you to apply the right protocol to the right area. Cleaning vs. Sanitizing: The First Line of Defense Cleaning is the essential precursor to chemical disinfection. It uses soap, water, and physical friction to remove dirt and organic matter from surfaces. While this process doesn’t kill every germ, it physically lifts them away, making the surface more receptive to further treatment. Sanitizing is a step above; it reduces the number of bacteria to levels deemed safe by public health standards. This is often sufficient for low-risk areas like dining tables or decorative shelving. However, relying solely on sanitization in a high-traffic bathroom after a viral infection may leave your roommates or family members at risk. Disinfecting: When and Where It Is Mandatory Disinfecting is the only way to ensure that lingering viruses and bacteria are actually destroyed. This process is mandatory for “hot zones” where pathogens are known to thrive, such as light switches, faucet handles, and electronics. The science of effective disinfection relies heavily on dwell time, which is the duration a product stays wet on a surface. If you spray a disinfectant and immediately wipe it away, you aren’t giving the chemicals enough time to work. Most EPA-registered products require between three and ten minutes of contact time to be effective. When working in the smaller square footage of a typical city apartment, always prioritize ventilation. Open windows and use air purifiers to manage fumes, ensuring your path to a healthy home doesn’t involve inhaling harsh chemical residues. The High-Touch Protocol: Essential Areas to Sanitize After Being Sick The “Zone Cleaning” method is the most efficient way to approach a deep cleaning apartment after illness. By categorizing your home into high-risk zones, you ensure that pathogens are systematically eliminated rather than just moved around. Start with the areas where you spent the most time while symptomatic. For most, this means the bedroom and bathroom. However, a truly healthy home requires a meticulous look at the “invisible” touchpoints. These include cabinet pulls, appliance handles, and even your thermostat. These surfaces are frequently touched but rarely cleaned with the precision required for biological safety. In the kitchen, the risk of cross-contamination is high. If you prepared tea or simple meals while ill, every handle you touched is a potential reservoir for germs. Focus on microwave buttons, kettle handles, and refrigerator grips. When selecting your supplies, you might look for An Eco-Friendly Approach to Post-Illness Sanitization to ensure you aren’t trading viral risks for chemical ones. Electronics also require a delicate touch. Use 70% isopropyl alcohol wipes on remote controls, keyboards, and smartphone screens. Avoid spraying liquids directly onto devices to prevent moisture from damaging sensitive internal components. The Bedroom Sanctuary: Bedding and Soft Surfaces Your bed is the primary recovery site, making it a critical focus for sanitization. Strip all linens and launder them on the warmest setting recommended by the manufacturer. If your washer has a steam cycle, use it to penetrate deeper into the fibers. For items that cannot be laundered, such as decorative pillows or “soft” clutter, use a handheld steamer or a fabric-safe disinfectant spray. Mattresses and pillows should be vacuumed with a HEPA-filtered machine and treated with a light mist of an EPA-registered disinfectant to ensure the sanctuary is truly restored. Apartment-Specific Touchpoints: Shared Spaces and Ventilation